Stick-E Tool
Use for,
- Layout: Stick, orient and snap items (mesh, groups, locators) to poly surfaces.
- Decals: Stick to surfaces (not projection), orient to edges and snap to points.
- Cutting Shapes: Stick, rotate and push; e.g. ready for boolean ops.
Overview
Interactively snap mesh items and group locators to polygon surfaces in your scene, then fine tune their alignment by rotating to edges, moving along local-axes, and snaping to points.
Workflow Quickstart
Step-by-Step
To active this tool
- Select a mesh item or group locator.
- Left-click on a polygon surface to align to that surface; or Right-click to activate the tool without without changing its orientation.
To interactively move an item accross a surface
- Left-click-hold and drag the mouse to move the item across the polygon surface under the mouse.
To rotate and push the item
- Use the tool handles —toggle their visibility via the in-view UI or tool properties— or enter precise values in the tool properties panel.
Shortcuts
Right-Click + Drag
- Auto-activates Spider-Snap whilst tracking across the surface. The selected item will snap to the indicated point and Spider-Snap will auto-deactivate when the mouse button is lifted. A real workflow time-saver.
Control + Left-Click + Drag
- Auto-activates Rotate-to-Edge. The selected item's (local up-axis) will rotate to match the direction of the indicated edge and Rotate-To-Edge will auto-deactivate when the mouse button is lifted.
Control + Right-Click
- Toggles on/off locking to the local Y-axis. Handy, when used in combination with Rotate-To-Edge which aligns the local up-axis (green-coloured) to an edge.
In-view User Interface
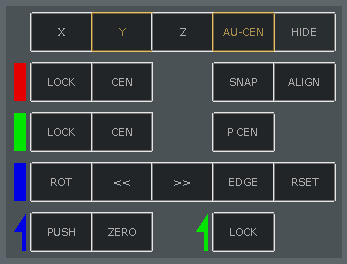
This interface floats in the 3D view, alongide the hit polygon or selected geometry, allowing quick access to the most used functions of this tool. Note, this in-view interface is somewhat experimental and has some limitations; e.g. draws like normal tool handles, hence, it can be partially obscured by geometry. You can disable it, if desired, within the tool properties panel.

Row One -- Initial Facing
X
Indicate that the item's original facing is along the X+ axis.
Y
Indicate that the item's original facing is along the Y+ axis.
Z
Indicate that the item's original facing is along the Z+ axis.
AU-CEN
Auto-centre: The geometry in your mesh item may not be centered at the origin. Use this option to centre the mesh to the hit surface position.
HIDE / SHOW
Toggle the visibility of the in-view UI.
Row Two -- Local X (Red)
LOCK
Locks tool movement to the local x-axis movement.
CEN
Centre the item along the local X-axis (red line).
SNAP
Toggle Spider-Snap™ on/off. Tip: If you right-click-hold whilst moving the mouse, then spider-snap will be automatically activated whilst the tool tracks across a polygon surface. Then, when you release the button, the mesh will automatically snap to the closet point and Spider-Snap will automatically deactivate.
ALIGN
Toggle the display of a 2D bounding-box gizmo that enables you to set the position of the mesh relative the hit position.
Row Three -- Local Y (Green)
LOCK
Locks tool movement to the local y-axis.
CEN
Centre the item along the local Y-axis (green line).
P-CEN
Snap the selected item to the centre of the hit polygon.
Row Four -- Local Z (Blue)
ROT
Toggle drawing of the rotation handle. Note, the rotate handle does not yet support angle snapping.
>>
Rotates the selected item clockwise by 90 degrees.
<<
Rotates the selected item counter-clockwise by 90 degrees.
EDGE
When active, move the tool's cross-hairs/reticle near to an edge and the selected item will rotate to align with that edge. Tip: You can use the shortcut of holding Control-Left-Click to automatically active this feature whilst you move the cross-hairs; When you lift the mouse button, rotate-to-edge will deactivate.
RSET
Resets rotation to its original state.
Row Five -- Local Z (Blue Arrow)
PUSH
Toggle drawing of the push handle, which allows you to move the item along the axis of the hit polygon's normal.
ZERO
Set the push value to zero.
Row Five -- World Y-up (Green Arrow)
LOCK
Sets the Height attribute to the current gizmo height and locks the tool to this height. This is useful when you wish to align multiple items at a given height on vertical surfaces; e.g. placing plug sockets or switches on walls. Whilst the lock is active, you can also set a precise height by adjusting the Height attribute, in tool properties.
Tool Properties (UI)
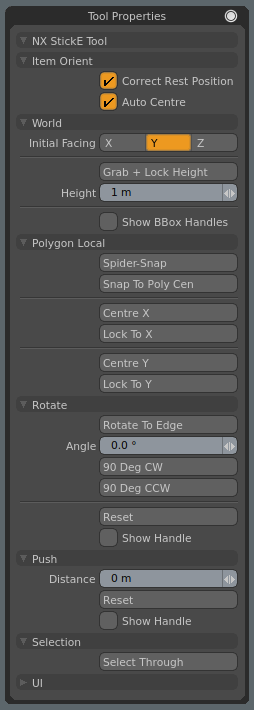
The user-interface appears in the tool properties panel (or pop-up) when the tool is activated. The function of each attribute is described below.

Item Orient
Correct Rest Position
Corrects the selected item's resting position on hit surface. Use when the initial position of the selected mesh is not resting on the plane (e.g. it's not sitting on the ground plane).
Auto Centre
The geometry in your mesh item may not be centered at the origin. Use this option to centre the mesh to the hit surface position.
World
Initial Facing
Set which direction should be considered as the initial facing of the selected item. Use this to rotate the the item to the desired orientation on the hit surface. For example, choose Z for a picture frame which is position at the origin in the XY plane with its main surface (picture, glass) pointing in the direction of the Z+ axis.
Grab + Lock Height
Locks the height of the tool, above or below the ground plane, to the current gizmo height. This is useful when you wish to align multiple items at a given height on vertical surfaces; e.g. placing plug sockets or switches on walls. Whilst the lock is active, you can use the Height attribute to set a precise height.
Height
Sets a fixed height for the tool, above or below the ground plane. Changing this value will auto-active Lock Height. Note, using Grab + Lock Height or Lock (from the floating UI) will override this value.
Show BBox Handles
A 2D bounding-box gizmo that enables you to set the position of the mesh relative the hit position.
Polygon BBox
Spider-Snap
Enable snapping to the nearest point. When you left-click-drag across a surface you'll see a line drawn to the nearest point. The selected item will snap to that point when the mouse button is lifted. Tip: Rather than manually turning this mode on/off, if you right-click-hold whilst moving the mouse, then spider-snap will be automatically activated whilst the tool tracks across a polygon surface. Then, when you release the button, the mesh will automatically snap to the closet point and Spider-Snap will automatically deactivate.
Snap to Poly Cen
Snaps the tool to the centre of the hit polygon.
Centre X
Moves the tool/item to the centre of the hit polygon's local right-axis (red).
Lock X
Locks the tool to the local right-axis (red-coloured). The tool's cross-hairs will become detached allowing you to move along this axis by clicking on any surface that has the same normal. Spider-Snap works alongside this mode, allowing you to contrain movement to the local x-axis whilst snap aligning to a point.
Centre Y
Moves the tool/item to the centre of the hit polygon's local up-axis (green).
Lock Y
Locks the tool to the local up-axis (green-coloured). The tool's cross-hairs will become detached allowing you to move along this axis by clicking on any surface that has the same normal. Spider-Snap works alongside this mode, allowing you to contrain movement to the local up-axis whilst snap aligning to a point. Tip: You can use the shortcut of Control-Right-Click to toggle this feature on/off.
Rotate
Rotate-To-Edge
When active, move the tool's cross-hairs/reticle near to an edge and the selected item will rotate to align with that edge. Tip: You can use the shortcut of holding Control-Left-Click to automatically active this feature whilst you move the cross-hairs; When you lift the mouse button, rotate-to-edge will deactivate.
Angle
Set the angle of rotation for the item. The item will rotate around the normal of the hit surface.
90 Deg CW
Rotates the item 90 degrees clockwise around the normal of the hit surface.
90 Deg CCW
Rotates the item 90 degrees counter-clockwise around the normal of the hit surface.
Reset
Resets the Rotate value to zero.
Show Handle
Turn-on to draw the rotate handle in the 3D view.
Push
Distance
Moves the mesh along the normal of the hit surface. Values can be both positive (move away from the surface) and negative (move through the surface)
Reset
Resets the push distance value to zero.
Show Handle
Turn-on to draw the push handle in the 3D view.
Select
Select Through
Active modo's Select Though mode. Left-click once to change the item selection and then left-click on the item again, and drag to move the item across the surface under the mouse. Note, shortcuts like activating Rotate-To-Edge by Control-Left-Clicking will not work whilst Select Through is active due to the way modo works.
UI
Draw Floating UI
Toggles drawing of the a floating UI in the 3D view. The floating UI allows quick access to the most commonly used tool features.
Position
There's no one ideal position for the floating UI in the 3D view relative to the tool, and improvements to this are ongoing. Currently, three options are provided,
- Poly Fixed : Position to the mid-right hand point of the hit polygon's bounding box.
- Poly Tracked : Position to the mid-right hand point of the hit polygon's bounding box, but tracks the cross-hair's position.
- Item Tracked : Moves with the selected item; Offset to the right-hand side.
Edge Intersect Markers
Markers can be drawn at the points when the local-axis intersect with the polygons edges. Choose between,
- Tick : Draws a short line at each intersection point.
- Circle : Draws a small circle at each intersection point.
- Tick and Cirlce : Draws both a small tick and circle at each intersection point.
- None : Disables drawing of the edge intersection markers.
Show BBox Handles on Snap
When this is enabled, the bounding-box alignment handles will be turned-on automatically after snap has occured.
Auto Hide BBox Handles
When this is enabled, the bounding-box alignment handles will be turn-off immediately after you have clicked on one of them.