First Light Kit | User Guide
Place Highlight
Use for
- Precise placement of specular light reflections relative to the render camera;
- Rotation of light reflections;
- Adjusting the distance of light to the surface;
- Use mesh items as lights.
Overview
Interatively place highlights (reflections from a light) precisely where you need them by clicking on- and moving across- polygon surfaces in the Perspective view. This tool works with lights and mesh items; e.g. you can use this tool to align the mesh output of the included Reflektor mesh-op.
Workflow: Quickstart
You can now use this tool to align mesh items, in addition to lights, using the same workflow demostrated in this video.
Workflow: Using Mesh Items As Lights
To use mesh items as lights, centre your polygons at the origin and ensure their facing direction is along the Z+ axis. The selected mesh item's children are not hit tested, allowing you the freedom to use multiple mesh items together as a "light".
Step-by-Step
To activate this tool,
- Select a single light or mesh item.
- Left-click on the Place Hightlight button in the First Light UI.
To use this tool,
- Left-click or left-click+drag on a polygon surface in the 3d view to begin highlight placement; or
- Right-click in the 3d view to ativate the tool without affecting the light's orientation.
Right-click activation is useful for adjusting a light's distance to the surface and rotation without affecting its facing. After a left-click is made on a polygon surface, highlight placement will commence as normal.
Other actions,
- Right-click + Haul: Controls the distance of the light from the surface.
- Move Handle: Controls the distance of the light from the surface.
- Rotate Handle: Controls the rotation of the light around its facing axis.
User Interface (UI)
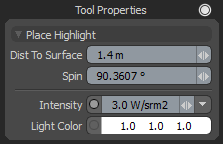
Dist To Surface
Set the distance of the light from the polygon surface. This can also be set using the move handle at the rear of the light.
Spin
Set the angle of rotation around the light facing. This can also be set using the rotation handle at the rear of the light.
Intensity
Set the Radiant Intensity channel of the selected light.
Color
Set the Color channel of the selected light.
Advanced Settings
Hit Handle: Draw Outer Circle
Toggle the drawing of the outer hit surface handle. This option is found under Advanced Settings in the First Light UI.
Updates
Version 1.1
- Added: Use any mesh as a light including the output mesh of the included Reflektor mesh-op.
- Added: Radiant Intensity and Color channels added to the UI.
Limitations
This tool was designed to work in the Perspective 3d view. 2d views are not supported. Camera views may add perspective distortion to initial clicked position in which case you'll need to click-drag the light to the desired position.
Does not support items with (non-identity) scale transforms applied due to a bug in the modo sdk; Translation and rotation transforms are supported.